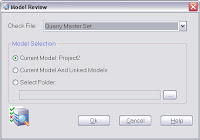
Along with the upgrades to Revit, Keyboard shortcuts and structural tools, there are 3 external tools added with the Advantage Pack. These tools are available for all three Flavors of Revit and work the same. The added applications are: Revit DBLink, Autodesk Revit Model Review and Autodesk ImageModeler 2009. Today I am going to discuss the Model Review
Model Reviewer
 Model Reviewer was developed by Avatech, and Autodesk Reseller, and sold to Autodesk. It is now part of the Revit Advantage Pack and downloaded from users subscription page. There are a couple of parts to the model review software. The extension that is accessed inside Revit, Check files that store the checking rules, and Results files viewable inside Revit or using the Results viewer.
  Model Review must be installed inside of Revit as an extension. The installer generally handles this but I had a bit of difficulty and it took a couple of tries. Once installed the button appears on the Ribbon in the Add-Ins tab with it's own Panel Titled Model Review. There are 2 buttons that interact with the model review, Check and Manage. Check starts the checking process, asking for a check file and which model to check. The program can check the current file, current and linked, or all models in a folder.
 The Check File is set and configured using the Manage Button on the Ribbon. After choosing the Check File and Revit file(s) the process will begin. The program will step through all rules in the Check File for each model selected. This may take some time depending on number of models, number of rules and objects accessed by the rules. When the program is finished, it will display the results. The results are saved in the Model Review folder in My Documents. It will be titled .bcf. The results viewer can be opened separately from Revit to view results files. The Results viewer can also export the results to an html file available to your browser anywhere. However the html file is read only and does not interact with the model.
Setting up the Rules
The Manage button on the Ribbon opens the manage dialog. In this dialog users can create, edit, organize and delete Check Files. At the top of the dialog, the list of rules for the check file are listed. Users can manage the Check rules there. Selecting a check in the top opens up the options tabs on the lower portion of the dialog allowing users to set check options for each rule as well as change the name and description. There are 33 different check templates and many of those have numerous settings. We will be looking at different checks and properties in future blogs.
Creating and Saving Check Sets
The file menu allows users to open, save, save as.. and create new check files. Users can start with a predefined file, blank file or any file they open. Add or modify check rules for each file and save to the proper location. However if the files are not added to the profile they will not be available for checking a model.
Managing Check Sets
The profile menu allows users to choose which check files are listed in the Check Model dialog box. The standards tab contains the current files allowed for checking. Use the add button to add a new check file, edit to rename or repath a file, and delete to remove a file. The Folders tab changes where the results are stored as well and where any additional plugins can be found. There is currently one plugin to check for firewall/door ratings. I understand there will be more to follow and possibly 3rd party plugins as well. Once the profile s edited, save and open the check model dialog, select the check file and run the check.
This week we will be reviewing the following rules: Family Size, Visibility, Parameters.


Do you want to start the construction of your new house? Then you should create a BIM model for your construction project. Because the BIM model will allow you to complete the construction of your project easily & faster. BIM Grand Prairie, Alberta
ReplyDelete