skip to main |
skip to sidebar
Structural Tools added with the Subscription Advantage Pack
For those users who have never worked Revit Structures these tools will be very new, but welcome. It users look to the new structural Tab they will see what appears to be some duplicate tools with a bit of a structural bent. In 2009 we had many of these tools which created similar elements to their architectural counterpart but with a few changes. This is still the case, but there is more control added to each structural element that was previously only available in Revit Structures.
Structural Deck
In Revit Architecture we could always see the deck profile settings, but since they were greyed out we could not do anything to make the change. I often would open the project in Structures to make those changes and load back to Architecture. Architects can now make those changes themselves.
There are a couple of steps to get the deck profile to display in section or Elevation (Note section or elevation only) users need to load and assign a deck profile to your floor type. The advantage pack shipped with extra content that was installed in the default content location.
Note: If you have moved the default content location you may need to download the content manualy and unzip. Only the new and update content is included.
Load the deck profiles into your project. (Library)/Imperial Library/Profiles/Structural/
In the Floor Type properties, click the Structure Edit button to open the structure of the floor. Note below the floor layers are 2 combo boxes to control the deck layer. Select a Layer and change the function to Structural Deck [1] The combo boxes will then become active.
Choose a deck profile, and whether or not it's standalone or part of the layer above. (Changes the overall thickness of the floor) Finish the type properties.
Draw a new floor slab. If started from the Structural tab->Floor->Structural Floor the Structural parameter will be on. If started from Floor it will be off. Turning this parameter on and off will show and hide the structural deck in the floor. It is an instance parameter so each floor in question will need to be changed.
First time users will probably get a warning when they create their first structural floor. The span direction annotation controls the direction of the deck so it displays correctly in section. Load this from (Library)/Imperial Library/Annotations/Structural/. After creating the structural floor attach the Span Direction Symbol. If you have canceled the command, the Span Direction Tool is on the Far right side of Annotation Tab. Rotate the symbol to alter the span direction of the metal deck.
In section or elevation the deck profile will display if the View Detail Level is set to Medium or Higher and the Structural Parameter is turned on in the Instance properties.
Truss Tool
Revit Structures has had a truss tool for a couple of releases and now the Architecture has it as well. This tool has two parts, the Truss family template and the ability to place the truss in the model.
The truss family template allows users to sketch a layout for the truss using top and bottom chords and web members. Users can assign structural framing shapes to each of the sketch members and assign parametrics to alter the size and shape of of the truss. Inside the project users can assign structural framing members to each of the sketch lines allowing for different members at the top and bottom chord and different web lines. Users can sketch a fast truss that can later be analytical to the structural engineer, or serve as a basis for their own truss design.
Beam System Framing Tag
Revit Architecture has been able to create the same beam systems as Revit structures for some time. However Architecture users could not tag the system with a span tag. Now users are able to tag your Beam Systems with a tag that reflects the member size and spacing. It will automatically adjust to cross the span and rotates with the Span of the system. Users can edit the tag to reflect firm standards.
Trimming and Coping Beams
Architectural Users can now trim, cut and cope beams in Revit architecture. The cut tool now works with Reference planes and beams. Draw a new plane across a beam and use the cut tool. The beam will miter to the angle. Coping allows users to cope beams to other beams or columns as well as set the distance of the coping.
Revit Keyboard Shortcut Editing
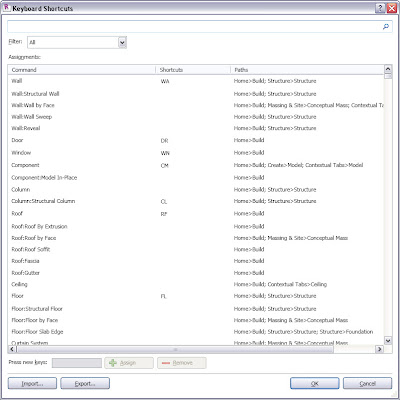
Along with the new tools for Revit in the Advantage Pack, we now have the ability to edit the keyboard shortcuts directly in Revit, through a dialog box. They also take effect immediately without restarting Revit.
The dialog box Pictured here:
This dialog is accessed through the options dialog on the Application menu (Big R button) It allows users to sort, filter and search for commands in various ways.
I started by filtering by tab and setting the shortcuts for each one. After doing that I searched for my favorites to make sure I had them all filled out. I then turned on all commands, sorted by the Shortcut to assist with finding duplicates. It appears Revit will not log the duplicates as it did with earlier releases.
I also exported the file to .xml and loaded it to Excel and Access. Both let me search quickly for duplicates and sort filter etc. Both methods seem to work so choose your best method.
Import Export
The dialog allows users to import and export their file to an .xml file for safekeeping or swapping with others. We tried this and it works great across multiple computers. However you still must send the file to each user, no common file to work off.
Now the Bad News
When you installed the Advantage Pack, Revit reset your shortcuts back to the factory and there is no way we could find to use a 2009 or 2010 txt file to update the current shortcuts. So if you are like me and just got your shortcuts finally worked out for 2010 you will need to start over. However it promises to be much better in the future I hope.
I later found there is a way to import your 2010 and 2009 shortcuts. It seems it misses some due to different command locations, but many are there. Good place to start.
In the previous post I listed the new features added to Revit on the Advantage packs. Also added were some new extensions as well as new downloads. These extensions and downloads are available for all three Revit applications.
New Downloads
- Extensions for Revit 2010
- Adds Wood Framing extension
- Updates to the Grid generator and Freeze Drawings tools
- Structure Extensions
- Support for Roads and bridges
- Integration with Civil 3D on Roads and bridges
- Updates to the Grid generator and Freeze Drawings tools
- Rebar now can be checked for interference
- Improves exports to Robot Analysis
- MEP Extensions
- Freeze Drawings tool update
All users also got access to the following separate tools
- Autodesk Revit Model Review
- Autodesk Revit DBlink
- Autodesk Imagemodeler 2009
Model review allows users to create a series of rules based on templates and run checks of your models for energy usage, Revit performance, and many other rule types. The rules are configurable, and can be saved as templates for future projects.
DBLink allows users to create and maintain links to Databases from Revit.
Image modeler is a tool to create 3D models from pictures. I do not know much more than that but we plan to check it out.
All of the above tools are separate installations and do not come in any of the Advantage packs but are available on the subscription website.
Autodesk yesterday released all the Advantage Packs for their various software platforms. For those of you in the AEC market and the BIM market this means:
- Revit Architecture 2010
- Revit Structure 2010
- Revit MEP 2010
- Navisworks 2010
- Autocad 2010
- Autocad for Architects 2010 (ADT)
The good news is the update is a patch and series of extra plugins instead of a full install. The update also includes the SP1 and SP2 patches for Revit and the Autocad based update includes many patches and hotfixes.
Today I am going to focus on the Revit platform and what changes were added to each one. We are going to start testing the features and writing about them here over the next few days.
Revit Architecture Features
- Added a structure tab with many structural tools now in Architecture
- Floors can now have structural deck shown
- Deck direction can be altered and shown in plan
- Beam coping is added
- Beam systems can now be tagged with span information
- Sloped columns are added
- Curved beams are added
- Beams can be attached to a 3D imported CAD model
- The truss tool is now available in architecture
- Convert Detail lines to model lines and vice versa
- Keyboard shortcuts are now editable in the application
- Shortcuts can be edited, exported imported and shared
- Conditional formatting in schedules is now available in all 3 disciplines
- This was available before but unknown since the button was hidden
- Text formatting can now be accomplished with keyboard shortcuts
- Find and replace tool for text elements
- Users can split walls with a gap in between (Added split with Gap on Modify Tab)
Revit MEP Features
- Temporary Dimensions for general layout mode in ductwork and piping
- Convert Detail lines to model lines and vice versa
- Keyboard shortcuts are now editable in the application
- Shortcuts can be edited, exported imported and shared
- Conditional formatting in schedules is now available in all 3 disciplines
- This was available before but unknown since the button was hidden
- Text formatting can now be accomplished with keyboard shortcuts
- Find and replace tool for text elements
- Users can split walls with a gap in between (Added split with Gap on Modify Tab)
Revit Structure Features
- Element Section Area and Linear Weight in Schedules
- Insulation tool added
- Convert Detail lines to model lines and vice versa
- Keyboard shortcuts are now editable in the application
- Shortcuts can be edited, exported imported and shared
- Conditional formatting in schedules is now available in all 3 disciplines
- This was available before but unknown since the button was hidden
- Text formatting can now be accomplished with keyboard shortcuts
- Find and replace tool for text elements
- Users can split walls with a gap in between (Added split with Gap on Modify Tab)